18 Nov How to Winterize Your Home
Winter time brings about cold weather. Some parts of the United States are colder than others, but the key to lowering heating bills is to winterize your home. This can be done in many different ways. A properly winterized home will produce a significantly lower heating bill.
The main items that need the attention when winterizing a home are:
- Heating unit
- Windows
- Doors
- Attic insulation
Table of Contents
Cleaning the Heating Unit and Changing the Air Filter
To begin the home winterizing process, start by Replacing the air filter to the heating unit and cleaning the air intake ports of the heating unit. Be sure to use a clean rag and cold water to wipe away any dust and debris off of the heating unit air intake ports behind the air filter. Use a vacuum cleaner to suck away any dust, debris and any other trash from around the heating unit coils and ports. Replace the old filter with a new filter each year.
Winterizing All of the Windows in the Home
If any cold air is getting in around the sides and bottom of the windows, then this will cause the heating unit to kick on and off more often then it should. As long as the cold air is coming in around the window, the heating bill will continue to increase.
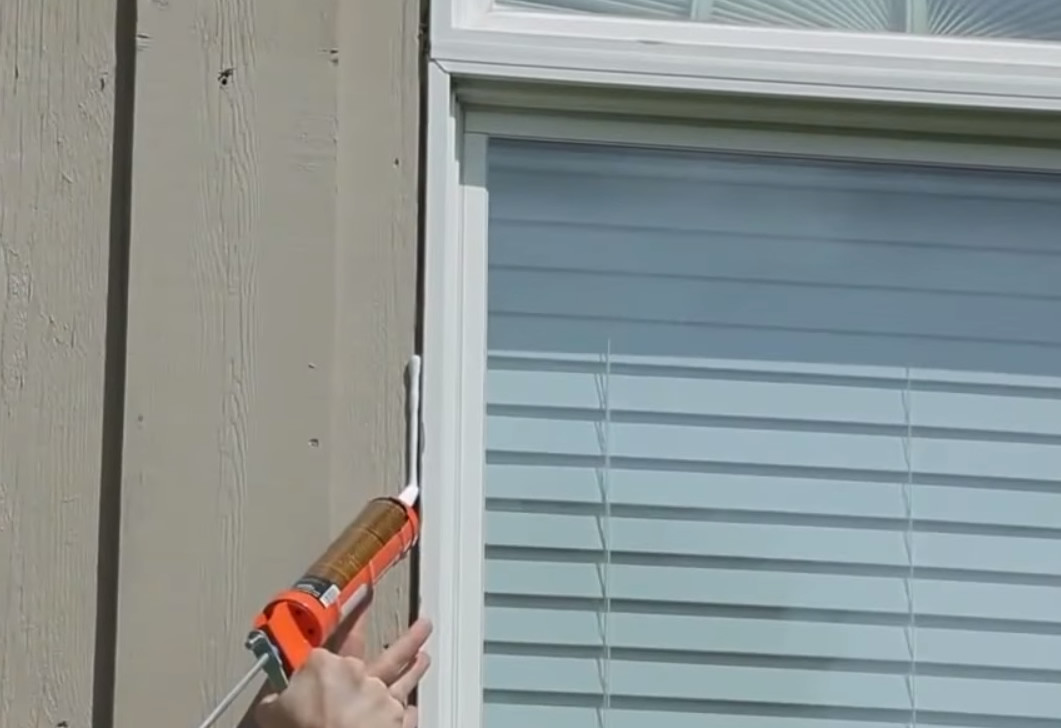
The solution is to inspect around all of the windows in the home and find out where the air is coming in. Then, use a caulking gun and caulk to spread a thin line of caulk all the way around the top side and bottom sides of the window. Use a type of silicone caulking around the windows to properly winterize each window. The silicone rubber caulking is thicker and it will last longer around the windows than basic caulking will. Caulk the inside and outside of the windows if needed. Read more about caulking here.
Sealing Around All Doors
One of the easiest ways for cold air to get into the house is from under the doors. The best way to combat this issue when winterizing your home is to use a door seal around the bottom of the door. There are different types of door seals that can be found at most all hardware stores.
There is a draft stopper that slides onto the bottom of the door and there is a bottom door seal that glues onto the bottom of the door. The key is to position the bottom door seal low enough on the bottom of the door so that it touches the floor or the carpet. This will prevent cold air and cold drafts from entering in the house from under the doors.
Make Sure That the Attic Insulation is Sufficient
The attic insulation is what keeps the heat inside of the house and prevents the heat from leaving the top of the house. Go to the attic and carefully check each designated attic insulation location to make sure that it is properly seated against the floor and that no varmints have tore any of the insulation up.
Preventing Ice Dams This Winter
Ice damming is the process of ice build up on the eaves of a roof. This is generally caused when heat escapes from the house, through the attic and warms the roof surface, melting the snow. The water then travels down the roof to the edge that is still cold because it overhangs the outside wall and is not affected by the direct heat loss of the attic.
The water freezes again, this time turning into ice. This problem continues over and over until the winter heating season is over. During this time, the ice shelf pushes the shingles up and allows water to flow in behind the shingles and can leak into the house. All of this from heat loss.
Because ice damming happens on so many homes, it has become an issue that many insulation contractors are used to dealing with. However, if you want it fixed once you have a problem, the price tag is not cheap. Doing it yourself is a messy and unpleasant process, but will save your roof and save you money in the long run.
Adding Ventilation and Perimeter Insulation
This job is not fun, but will significantly decrease the amount of heat loss along the edge of the roof. Pull any existing insulation back with a rake or fold it over if it is in batt form, and install tack-in-place proper vents in every rafter bay. These chutes have tabs on them that allow you to secure them to the top plate of the wall and the rafters on each side with a hammer stapler. The chute allows insulation to sit on top of the top plate, significantly increasing the R-value around the perimeter of the house. This is not an easy job and has to be performed on every rafter bay.
If you have existing insulation, lay it back down as best you can and add 4 to 10 inches of blow-in cellulose insulation around the perimeter of the house, making sure that the insulation is over the top plate around the entire perimeter. Cellulose insulation is ground up recycled newspaper that has sulfides or borates added to it as a fire retardant and pesticide. Cellulose is one of the best insulation materials currently on the market and has an R-value higher than fiberglass (R-3.8 per inch versus R-3.5 per inch) and a better performance in the attic area of a home.
Add insulation to the remainder of the attic as well so that there is a nice even blanket of cellulose across the entire attic, preventing heat loss through the ceiling.
Using this method will significantly decrease the likelihood of ice damming on the roof of your house. If you have aluminum gutters, know that any water melting off the roof that hits the gutters will probably turn to ice. This is not technically an ice dam, but can form a dam on the gutter. This is typical in weather condition where the temperature fluctuates significantly from day to day during the early winter months and is not as much of an issue when winter is in full swing.
Depending on where you live, rebates and tax incentives may be available for performing this type of project because of the energy efficiency aspect of adding attic insulation.
Keep Thermostat at a Consistent Setting
Find a comfortable setting on your thermostat and keep it there. Consistently adjusting a thermostat can increase the amount of heat used. Stick with a consistent setting depending on how cold the weather is. Generally, 70-75 degrees is considered a comfortable consistent setting.
The key points outside of the insulation are to make sure that any and all openings are sealed and that the heating until is cleaned and working properly. Read more about attic insulation and window insulation here. Programmable thermostats are useful because they allow for different temperatures in different rooms. There is no need to supply heat to rooms that are never used, like storage rooms. When a space needs to be heated that is not used on a regular basis, a space heater is a better option than an energy draining furnace.
It is also nice to have a programmable thermostat installed because the homeowner can set it to have warmer temperatures when people are in the house and lower it during the day when people are at work. Heat vents can also be blocked in rooms that are not used often so that the heat can go to the places where it is needed the most. Don’t make the mistake of turning the furnace off completely, though. It takes a lot more energy to heat a house back up than it does to keep it at a consistent temperature.
Install Radiant Barrier Foil
Radiant barrier paint and foil are becoming increasingly popular. Install it once and save on cooling and heating costs over the long term.
There are 2 types of thermal applications. The first is paint, typically infused with microscopic porcelain pellets and aluminum flakes. When spray painted on the underside of the roof decking, it will block 60% to 80% of the sun’s heat. Which is fine for summer, but does nothing to help lower utility bills during the winter.
A better choice is to install radiant barrier foil on the attic floor. This will stop up to 97% of heat from entering the home through the attic insulation and drywall ceiling. More importantly, it does double duty by keeping the heat in during the winter.
Avoid Frozen Pipes
Frozen pipes are not only a headache. If one happens to burst, the repair job can be quite an expense. It’s cheaper to install pipe insulation now, before Jack Frost visits. Don’t be out in the cold trying to thaw a frozen water pipe. This insulation is very inexpensive and can be found at Home Depot and many other home improvement stores.
The insulation is just lengths of foam tubes with a slit down one side so it can simply be snapped onto plumbing pipes. Check for pipes in the attic, crawlspaces, and unheated areas of the home, such as the garage.
Avoiding the problem of frozen pipes, which can burst and eventually leak, is paramount in winterizing a house. There are a number of supplies needed to prepare winter plumbing. Before working on winterizing the house, get a home repair kit, as well as
- Household antifreeze
- Disposable measuring cup
- Garden hose
These items will be used in preparing plumbing for winter and avoiding the cost of home plumbing repair in the spring. Being ready for winter is simple.
How to Protect Plumbing
Turn off the main water valve. If the water valve is connected to a public utility, have the utility turn off the water. This can save homeowners a great deal of money, in addition to avoiding the problem of having to fix frozen pipes the following year. Once the main water valve has been turned off, turn on all of the faucets in the house. Start at the top floor and move to the basement.
Flush each toilet, and pour about two cups of household antifreeze into the toilet tank. This will help keep the toilet pipes from freezing during the winter. Use the disposable measuring cup to get the correct amount of antifreeze. Close the toilet lid.
Pour household antifreeze into the sinks and the bathtub traps. This will prevent pipes from freezing. Cover the drains to prevent insects from coming into the house through the pipes during the winter. Pour two more cups of household antifreeze into the main water trap in the basement.
Water Heaters – Preparing a Water Heater for Winter
To avoid a leaking or ruined water heater, the heating tank needs to be drained before the summer house is closed up for the winter. Start by turning off the power to the water heater on the circuit breaker. This will turn off the energy going to the water heater, which can also save homeowners money during the winter.
Attach a garden hose to the drain valve on the water heater, and drain the water out of the heater until it is empty. Ensure that the water drains outside, and downhill if possible. This will empty the hose and keep it from freezing.
Once the water heater is empty, drain the hose and wrap and store it in a dry place for the winter. The house will be ready for freezing weather, and it will not be necessary to hire a plumber to replace water pipes or repair leaky plumbing in the spring.
Winterization Tips for Outside
Inside the house should not be the only place where you need to look if you really want to thoroughly winterize your house, you must also check that everything is done properly outside. Check roof for any loose or missing shingles. Missing or loose shingles greatly increase the risk of a roof leak. Missing shingles should be replaced and loose shingles can be nailed in place if necessary, or can be replaced. Severe wind can blow loose shingles off, also increasing the risk of a roof leak.
Gutters should be cleaned to remove any dirt and debris leftover that has settled. Missing, broken or loose gutters should be replaced. Clogged gutters increase the risk of water leaking through the walls near the ceiling.
Pipes should be covered with insulated foam or wrapped with a towel to prevent broken pipes. Outdoor garden hoses should be removed to prevent water from freezing in the hose, which can result in broken pipes as well.
Check insulation under the house. Missing or damaged insulation can cause additional drafts and heat loss through the floor. If replacing the insulation is not an option, placing additional rugs on the floor inside the home can help prevent heat loss through the floor.